
How a central vacuum system works, and gets installed
Tubing in your walls carries 100% of contacted dirt and allergens to a power unit in the garage or basement. No outside venting required. Complete systems start at $1,695 installed, first three inlets included.
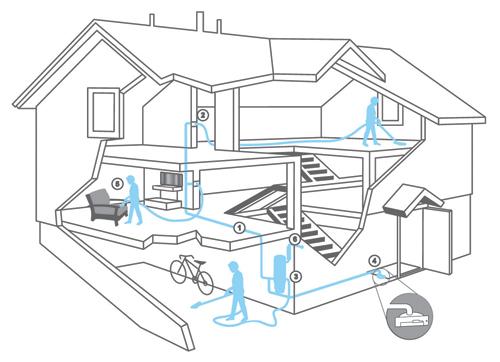
The system, in plain English
Insert the lightweight hose into a wall inlet and the system switches on. Suction travels through in-wall tubing to the power unit, typically in the basement, garage, or a ventilated utility room, where dirt collects in a large receptacle you empty two or three times a year. Most homes need about three inlets, and because the motor lives outside your living space, the quiet hush of airflow is all you hear.
Choosing between professional and DIY? Professional installation by our own employees is the popular path, but the DIY steps below are the real thing, and our showroom will outfit you completely either way.
New home installation
Building or planning to? Ask your builder to include a BEAM system, rough-in happens after plumbing and electrical, before drywall. Discuss power-unit placement, inlet locations, and hose storage on each level (an enlarged closet or an extra base cabinet is all it takes). Builders familiar with BEAM often suggest a VacPan® automatic dustpan for the kitchen or mudroom. See our builder programs.
Existing home installation
About 95% of existing homes, regardless of age, can be retrofitted. The key is planning pipe runs with the fewest inlets and elbows, which keeps labor time and cost down while preserving full coverage. Remodeling? That's the cheapest moment to add BEAM piping. Full details on the existing-home retrofit page.
3-5×
more suction power than a portable vacuum*
95%
of existing homes can be retrofitted
<1 day
typical installation time
$1,695
complete systems, installed, start at
*Up to 3 to 5 times, versus typical portable vacuums. No outside venting required.
Do-it-yourself: the six steps
Choose and personalize your system
Pick the BEAM power unit, cleaning package, and accessories that fit your home. Calculate inlets: one per 700-900 sq ft.
Place the inlets
Fewer inlets means more power. Make sure the hose reaches every corner; avoid walls with pocket doors. Floor inlets are an option.
Plan the piping
Run under the floor where possible; use the attic, crawlspace, closets, or a soil-pipe chase for upper floors. A tubing cutter and a 2-1/4" Forstner bit make clean work of it.
Install the inlet valves
Drill a pilot hole, locate the wall cavity from below, cut the opening, mount the bracket, and connect the low-voltage wire.
Install the pipes
Deburr every cut, glue from the farthest inlet toward the trunk line, and splice the low-voltage wire along the run.
Mount the power unit
Hang the unit in the garage or basement, connect low-volt wires, plug in, and test with the manual override switch.
Want the full tools list and the coat-hanger pilot-hole trick? Call the showroom, we'll walk you through it and stock every fitting you need. When in doubt, get the free professional quote first; it often costs less than people expect.
Prefer it done for you?
Our employee installers finish most homes in under a day, with a 90-day money-back guarantee.